
本文將教授如何使用程式製作一個簡單的點名網頁。透過這個點名系統,你可以方便地管理你的學生出席狀況,並且隨時查詢歷史出席紀錄。我們將使用 Google Apps Script, GitHub 和 Google Sheets 來建立這個點名系統。我敢保證即使你完全不會程式也可以在 5 分鐘內完成。本文會詳細說明從建立 Google Sheets 到部屬網頁的步驟,並提供完整的程式碼和演示網頁。
我在兩年前曾經寫過一篇【Google Apps Script】自製點名系統,出乎意料地幫助到許多人,所以我決定重新寫一次,比上次更容易製作和操作,也更好看一些 (我覺得啦)。
範例網頁
首先,我們先來看一下最終的成果。這是我們要製作的點名系統的演示網頁。你可以查看點名系統演示網頁,他有以下幾個功能
- 點名:點擊學生姓名,即可完成點名
- 新增學生:輸入學生姓名點擊新增按鈕,即可新增學生
- 查詢歷史出席紀錄:輸入學生姓名點擊查詢按鈕,即可查詢歷史出席紀錄
好了,我們現在就開始製作這個點名系統吧 w
步驟一:建立 Google Sheets 文件
首先,我們需要建立一個 Google Sheets 文件,用於存儲學生的出席情況。在這個文件中,我們可以添加學生名稱、出席時間、剩餘課堂等訊息。
請打開我建立的這個範例文件並建立副本
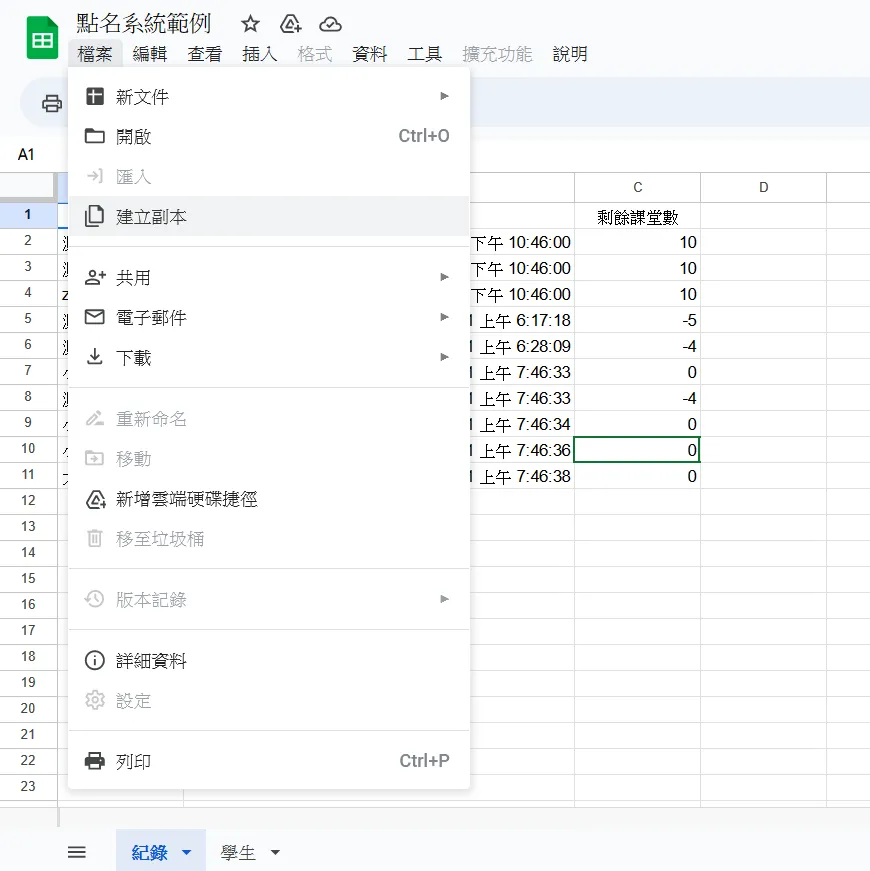
這樣 Google Sheets 就做好了。請複製這個文件的 ID,我們稍後會用到。ID 就是網址中的一長串字母和數字,比如說這個試算表:
https://docs.google.com/spreadsheets/d/1m0F6pOejN-ldKFIrFwssmoEPB3EPDmSQJKEPr9T88-E/edit#gid=0它的 ID 就是1m0F6pOejN-ldKFIrFwssmoEPB3EPDmSQJKEPr9T88-E。
步驟二:建立 Google Apps Script
現在,我們需要建立一個 Google Apps Script,用於向 Google Sheets 文件中添加和讀取資料。請在網址輸入script.new,進入 Google Apps Script 編輯器。接著貼上我的這一串程式。請把第一行的雙引號裡面換成剛才複製的 ID。
const id = "1m0F6pOejN-ldKFIrFwssmoEPB3EPDmSQJKEPr9T88-E";function doGet(e) { let t = e.parameter, a = SpreadsheetApp.openById(id).getSheets(); switch (t.type) { case "call": if (!t.time) return ContentService.createTextOutput(!1); return (a[0].appendRow([t.name, t.time, t.remain]), ContentService.createTextOutput(!0)); case "list": var r = a[1] .getRange(2, 1, a[1].getLastRow() - 1, a[1].getLastColumn()) .getValues() .filter(e => "" !== e[0]) .map(e => ({ name: e[0], left: e[2] })); return ContentService.createTextOutput(JSON.stringify(r)).setMimeType(ContentService.MimeType.JSON); case "search": var [n, ...r] = a[0].getDataRange().getValues(); let [u, i, p] = n, s = n.indexOf(u), m = n.indexOf(i), c = n.indexOf(p), l = r.filter(e => e[s] === t.name).map(e => ({ time: e[m], left: e[c] })); return ContentService.createTextOutput(JSON.stringify(l)).setMimeType(ContentService.MimeType.JSON); case "new": let f = a[1].getLastRow() + 1; return (a[1].appendRow([t.name, `=COUNTIF('紀錄'!A:A,A${f})`, `=D${f}-B${f}`]), ContentService.createTextOutput(!0)); default: return ContentService.createTextOutput("別亂撞我~"); }}我們需要把它部屬成網頁,請點擊左上角的部屬,新增部屬作業,選擇部屬為網頁應用程式。執行身分選自己 (我),誰可以存取選所有人。接著點擊部屬,複製網頁應用程式網址。比如說:
https://script.google.com/macros/s/AKfycbzxqGIMBbLkCka2aveltdVHYtdG-k_X98qzSd_V9MHDxWaOYXFwZgE3rRHDzCakzTxs/exec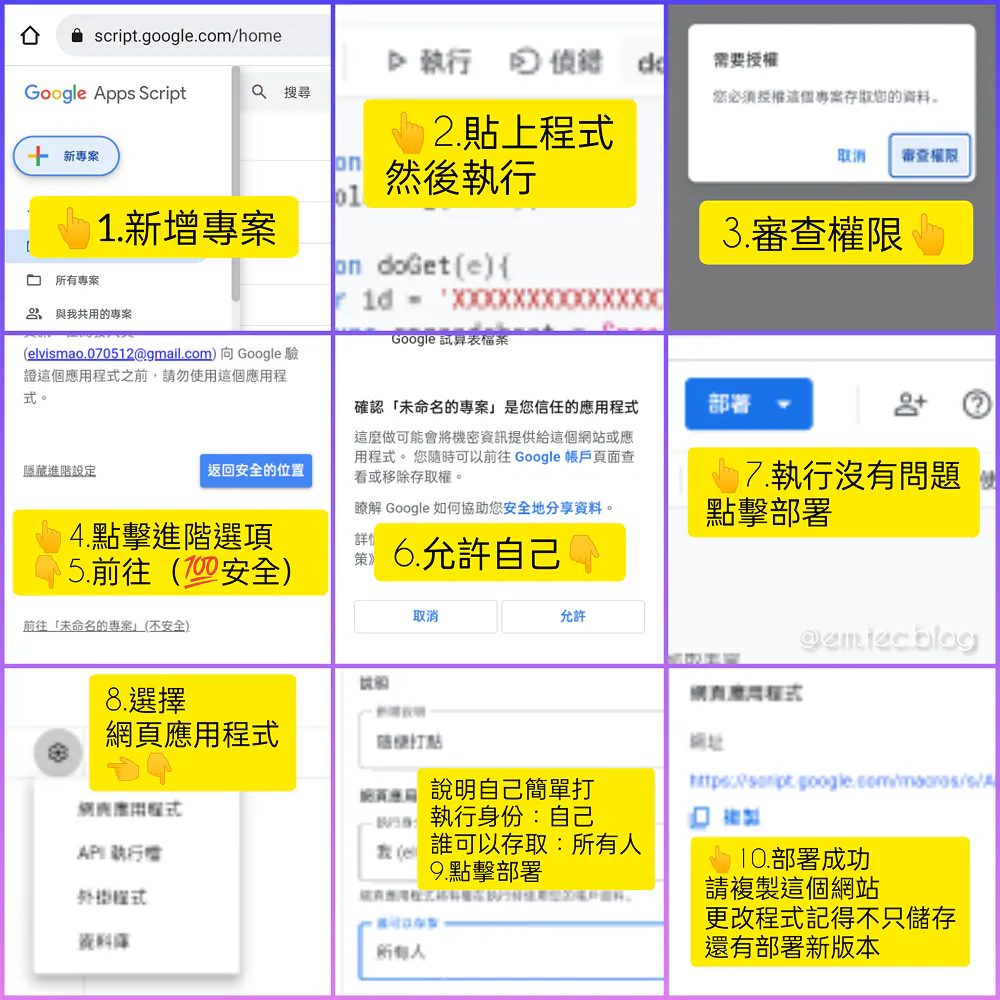
步驟三:建立網頁
請你在任意一個網頁代管服務,比如說 Vercel,GitHub Pages, Gitlab Pages, Netlify 等等,建立一個網頁。接著在網頁中貼上以下程式碼。
如果你沒有使用過這些服務,可以參考以下教學:
使用 GitHub Pages 部屬網頁
請先註冊帳號,你可以參考以下影片:
影片替代內容:這支 Instagram Reel 示範如何註冊 GitHub、建立 GitHub Pages 網站,並把點名系統的 HTML 檔案放上線。下方文字提供同等步驟,包含建立網頁、貼上程式碼與部署方式。
部屬網頁有兩個辦法。選一個就可以了
用戶名.github.io
第一個是影片說明的方法,就是建立一個叫做用戶名.github.io的倉庫,然後建立一個index.html的檔案並貼上以下程式。
<!doctype html><html lang="zh-TW"> <head> <meta charset="UTF-8" /> <meta http-equiv="X-UA-Compatible" content="IE=edge" /> <meta name="viewport" content="width=device-width, initial-scale=1.0" /> <title>簡易點名系統</title> <meta name="theme-color" content="3B4252" /> <style> h1 { /* 標題顏色 */ color: var(--nord7); } body { /* 背景顏色 */ background-color: var(--nord0); } body { /* 可選顏色 */ --nord0: #2e3440; --nord1: #3b4252; --nord2: #434c5e; --nord3: #4c566a; --nord4: #d8dee9; --nord5: #e5e9f0; --nord6: #eceff4; --nord7: #8fbcbb; --nord8: #88c0d0; --nord9: #81a1c1; --nord10: #5e81ac; --nord11: #bf616a; --nord12: #d08770; --nord13: #ebcb8b; --nord14: #a3be8c; --nord15: #b48ead; --black: #000; --line: #4c566a; } main, nav { display: flex; } .call button, button:hover { background-color: var(--nord2); } button, section > div { background-color: var(--nord1); box-shadow: rgba(0, 0, 0, 0.2) 0 0 0.5rem; } main, section > div { padding: 1rem; width: 100%; } footer, footer a { color: var(--nord4); } .search button, button, input, section > div { box-shadow: rgba(0, 0, 0, 0.2) 0 0 0.5rem; } body, button, h2, html { text-align: center; } * { padding: 0; margin: 0; box-sizing: border-box; font-family: Arial, "微軟正黑體", Helvetica, sans-serif; color: var(--nord6); } body, html { min-height: 100%; } main { flex-direction: column; height: 100vh; height: 100dvh; max-width: 500px; margin: 0 auto; } nav { justify-content: space-between; } button { display: block; height: 50px; width: calc(1 / 3 * 100% - 1rem); line-height: 50px; border-radius: 1rem; text-decoration: none; border: none; cursor: pointer; transition: background-color 0.2s ease-in-out; } #call, .search, footer { display: flex; } .call button { width: calc(1 / 4 * 100% - 1rem); margin: 0.5rem; } button:hover { filter: brightness(1.2); } button:active { background-color: var(--nord3); filter: brightness(1.5); } section { flex-grow: 1; margin: 1rem 0; position: relative; } footer { justify-content: flex-end; align-items: flex-end; } section > div { border-radius: 1rem; overflow-x: hidden; overflow-y: auto; position: absolute; height: 100%; transition: opacity 0.5s ease-in-out; } #add, #history { opacity: 0; } #call { z-index: 2; flex-wrap: wrap; justify-content: space-between; } .search { justify-content: center; align-items: center; } .search button, input { height: 2rem; width: 50%; border-radius: 0.5rem; border: transparent; padding: 0 1rem; background-color: var(--nord3); color: var(--nord4); } h2, table { width: 100%; } input:focus { outline: transparent; } .search button { margin-left: 1rem; width: auto; line-height: 100%; } table { border-collapse: collapse; margin-top: 1rem; } tr { border-bottom: 1px solid var(--line); } td { padding: 0.5rem; } h2 { margin-top: 2rem; font-weight: 600; } #status { margin: 0.5rem 0 1rem; color: var(--nord13); font-size: 1.3rem; } </style> </head> <body> <main> <h1>簡易點名系統</h1> <h2 id="status">歡迎使用</h2> <nav> <button onclick="searchA()">查詢紀錄</button> <button onclick="callA()">點名</button> <button onclick="addA()">新增學生</button> </nav> <section> <div id="history"> <div class="search"> <input type="text" /> <button>搜尋</button> </div> <table> <thead> <tr> <td>時間</td> <td>剩下課堂</td> </tr> </thead> <tbody></tbody> </table> </div> <div id="call"> <h2>載入中</h2> </div> <div id="add"> <div class="search"> <input type="text" /> <button>新增</button> </div> </div> </section> <footer> <a href="elvisdragonmao.github.io/">毛哥EM</a> 製作 | <a href="https://emtech.cc/p/rol-call/">教學</a> </footer> </main> <script> //部屬連結放這裡 var url = "https://script.google.com/macros/s/AKfycbzxqGIMBbLkCka2aveltdVHYtdG-k_X98qzSd_V9MHDxWaOYXFwZgE3rRHDzCakzTxs/exec"; const [history, call, add] = ["history", "call", "add"].map(t => document.getElementById(t)), searchA = () => { ((history.style.opacity = 1), (history.style.zIndex = 2), (call.style.opacity = add.style.opacity = 0), (call.style.zIndex = add.style.zIndex = 1)); }, callA = () => { ((history.style.opacity = add.style.opacity = 0), (history.style.zIndex = add.style.zIndex = 1), (call.style.opacity = 1), (call.style.zIndex = 2)); }, addA = () => { ((history.style.opacity = call.style.opacity = 0), (history.style.zIndex = call.style.zIndex = 1), (add.style.opacity = 1), (add.style.zIndex = 2)); }; fetch(url + "?type=list") .then(t => t.json()) .then(t => { let e = document.getElementById("call"); ((e.innerHTML = ""), t.forEach((t, n) => { let a = document.createElement("button"); ((a.textContent = t.name), (a.id = `student-${n + 1}`), a.addEventListener("click", () => { rollCall(t.name, t.left, n + 1); }), e.appendChild(a)); })); }) .catch(t => console.error(t)); const status = document.getElementById("status"); function rollCall(t, e, n) { status.innerHTML = `${t} 點名中...`; var a = new Date(), a = a .toLocaleString("zh-TW", { year: "numeric", month: "2-digit", day: "2-digit", hour: "numeric", minute: "numeric", second: "numeric", hour12: !0 }) .replace("-", "/") .replace(" ", " "); fetch(url + `?type=call&name=${t}&time=${a}&remain=${e}`) .then(a => { a.ok ? ((status.innerHTML = `${t} 已點名成功!剩餘課堂:${e - 1}`), (document.getElementById("student-" + n).style.backgroundColor = "var(--nord14)")) : ((status.innerHTML = `${t} 已點名失敗!剩餘課堂:${e}`), (document.getElementById("student-" + n).style.backgroundColor = "var(--nord11)")); }) .catch(t => { status.innerHTML = `發生錯誤:${t}`; }); } const searchBtn = document.querySelector("#history button"), searchInput = document.querySelector("#history input"), historyTableBody = document.querySelector("#history tbody"); searchBtn.addEventListener("click", () => { status.innerHTML = "搜尋中..."; let t = searchInput.value, e = `${e}?type=search&name=${encodeURIComponent(t)}`; fetch(e) .then(t => t.json()) .then(t => { let e = document.querySelector("#history table tbody"); ((e.innerHTML = ""), t.forEach(t => { let n = document.createElement("tr"), a = document.createElement("td"), l = document.createElement("td"); var r = new Date(t.time); ((a.textContent = r .toLocaleString("zh-TW", { year: "numeric", month: "2-digit", day: "2-digit", hour: "numeric", minute: "numeric", second: "numeric", hour12: !0 }) .replace("-", "/") .replace(" ", " ")), (l.textContent = t.left), n.appendChild(a), n.appendChild(l), e.appendChild(n), (status.innerHTML = "搜尋完成")); })); }) .catch(t => (status.innerHTML = t)); }); const addBtn = document.querySelector("#add button"), addInput = document.querySelector("#add input"); addBtn.addEventListener("click", () => { let t = addInput.value; t && ((status.innerHTML = "新增中..."), fetch(`${url}?type=new&name=${encodeURIComponent(t)}`) .then(t => (status.innerHTML = "新增成功")) .catch(t => { status.innerHTML = t; })); }); </script> </body></html>請把第 265 行的雙引號裡面換成剛才複製的網頁應用程式網址,然後按下儲存。這樣你的網頁就完成了!你可以到網址https://你的GitHub帳號.github.io/來使用你的網頁。
Use this template
第二個方式也很簡單,請先到這個點名系統 GitHub 倉庫並點擊右上角的 Fork,或是 Use this template。倉庫名稱 Repository name 會成為你的網址 (例如:https://你的 GitHub 帳號.github.io/倉庫名稱),然後點擊 Create repository from template。
請點擊檔案index.html並點擊右上角的鉛筆按鈕編輯,把第 265 行的雙引號裡面換成剛才複製的網頁應用程式網址,然後按下儲存。
然後再到你的倉庫裡面,點擊 Settings,然後點擊左邊的 Pages,把 Branch 改成 main,然後按下 Save,就完成了!
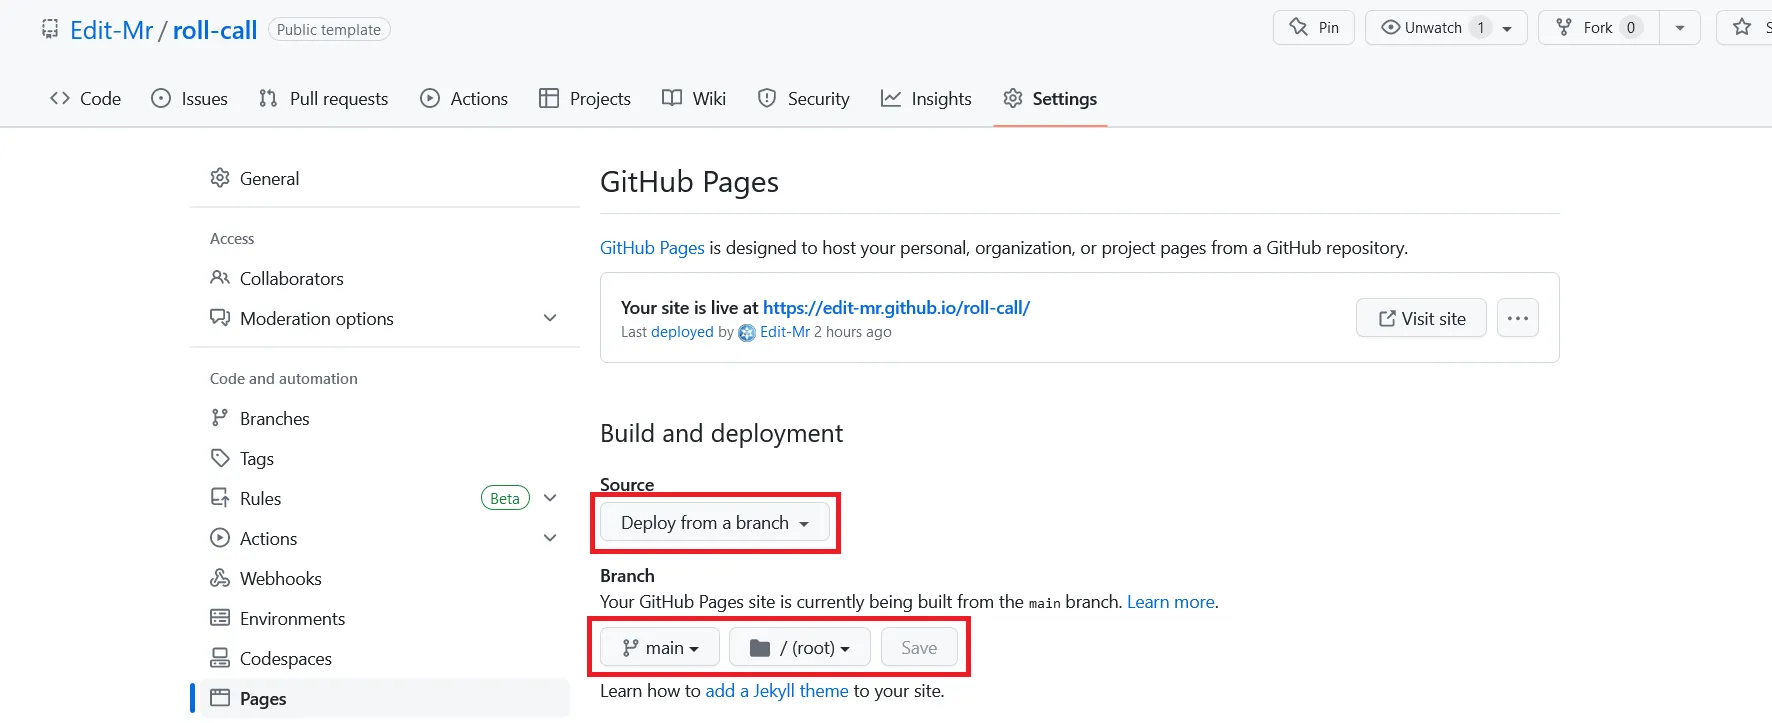
好啦,現在你的網頁就完成了!你可以到網址https://你的GitHub帳號.github.io/倉庫名稱來使用你的網頁。
自訂
這樣你的網頁就建立完成且可以使用了。如果你想客製化顏色的話可以修改 CSS。比如說如果你想改標題你可以修改第 13 行
color: var(--nord7);你可以改成任何顏色,例如:color: red,或是color: #ff0000,或是color: rgb(255, 0, 0)。
你可以 Google colorpicker 選取顏色,然後把 HEX 或是 RGB 的數字貼上去。
或是你可以使用預設的 Nord 顏色組。使用方式就是預設那樣,只要修改數字就好了。對應的顏色如下:
--nord0: #2E3440;
--nord1: #3B4252;
--nord2: #434C5E;
--nord3: #4C566A;
--nord4: #D8DEE9;
--nord5: #E5E9F0;
--nord6: #ECEFF4;
--nord7: #8FBCBB;
--nord8: #88C0D0;
--nord9: #81A1C1;
--nord10: #5E81AC;
--nord11: #BF616A;
--nord12: #D08770;
--nord13: #EBCB8B;
--nord14: #A3BE8C;
--nord15: #B48EAD;
希望你喜歡這個網頁!如果你覺得這篇文章有幫助到你歡迎在Instagram或Google 新聞追蹤毛哥EM資訊密技。如果你有任何問題,歡迎直接到毛哥EM資訊密技的 Instagram 私訊我,我很樂意協助解決你的問題。


留言
留言區